Top Stories
- The Finest Approach to Elevating Senses is AMUSE CANNABIS Your All Question Regarding
- Procure Edge Compute Edge Delivery and Edge Securities Services with StackPath Coupon Code
- Access Infinite Connectivity with XFINITY
- Zyro a professional website with SEO-friendly features and free hosting plans
- Adore Beauty AU Promo and Coupons Codes
- Where to Stay in Las Vegas The Best Trivago Hotels More Affordable than You Think
- It is Time to Save Big with PrettyLittleThing Exclusive Sale
- The Sonu Sleep System Side Sleeping Tech Best Mattresses for Side Sleeper
- The Best Anatomie Kenya Jacket
- Ekster Wallet or Kings Loot Wallet Which One Win
- The Best Nike Shoes Collection
- Ithemes Imperative WordPress Itheme Security Pro
- Saramart UK AU Reviews
- Top 10 Jackets by Palm Angels
- Anatomie Women Sale Items
- Find Your Perfect Peak Design
- GAME-CHANGING CAMERA ACCESSORIES
- How to Backup Your IPhone Data
- Earth Day 2018 (Facts) - A Source to Protect The World
- How to Backup Your Android Data Very Fast & Easily
- Introducing An Amazing Apple Cell Phone With Prices
- Newly Designed iPhone X Features
- Apple’s New Innovation-High In Price But Perfect In Style
- Rumors About iPhone 9 - It Brings Something New
- Wait For IPHONE 9 Is Going to Be Over Soon
- Nintendo Direct Provides A Way Towards Gaming News
- Enjoy High-Level Gaming Through Fortnite Battle Royale
- Instant Repair at Your Doorsteps
- Fastest Phone Repair Service In New York
- Six Pro Tips to Protect Your Cell Phone Screen
- 2 Simple Methods to Fix Broken iPhone Screen at Home
- Fastest Phone Repair Service in New York
- What to do When Your Mobile Responds Strangely - Fix it Up
- Ways to Keep Your Mobile Phone’s Screen Protected and Clean—Its Simple and Effective
- 5 Pro Tips To Keep Your Phone Away From Over Heating In Summers
- 7 Reliable Tips to keep Your Mobile’s Touchscreen Safe and Protected
- Most Common Smartphones Repair Seen By Smart Fix Technicians
- How to Judge When It’s Time to Replace Your Mobile`s Battery
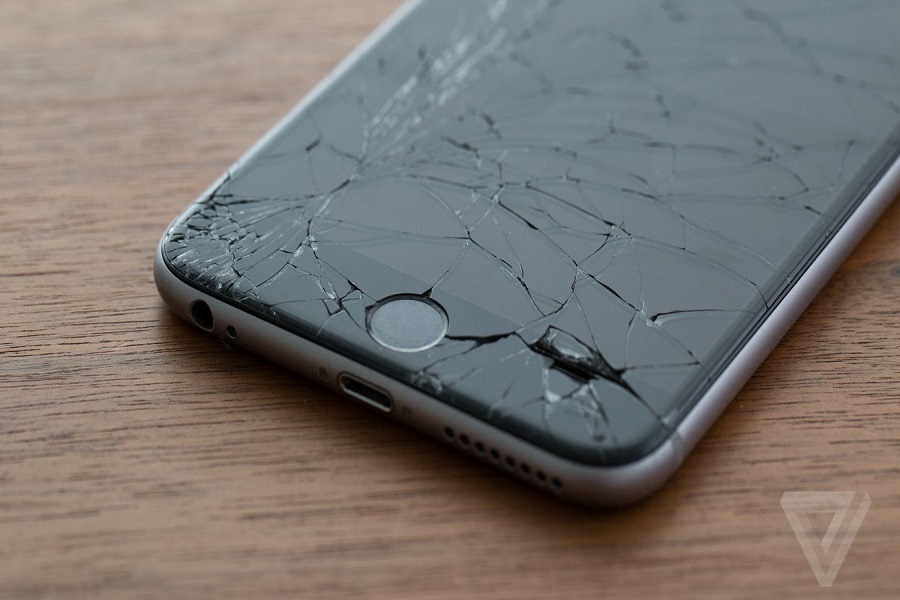
We are living in the age of science and technology. In this world full of technology the best invention that we have is our iPhone. IPhone allows you to do any work on it. You can easily carry your phone with yourself. But what if your iPhone screen is cracked? And you don’t have much time to give it on the shop for repair? Then don’t worry, we will provide you 2 simple methods through which you can quickly fix cracked iPhone screen at your place.
METHOD 1:
For this method, you just need repairing kit that consists
of normal household tools and a new screen.
Lifting up the
screen:
- With the help of small pentalobe screwdriver (frequently used by Apple) opens the two screws at the right bottom of the home button.
- Now take the suction cup and place it on the
bottom half of the screen.
- If the screen is badly damaged and suction cup
is not stick on it then cover the broken screen with tape before using suction
cup.
- When the suction cup is smoothly stick on the
screen then pull it gently. By doing this firmly, the screen starts to remove
from the frame.
- Once the screen is start to detach then loosen
the screen by sliding the pry tool slowly at the bottom of the screen.
- Doing the same sliding process on the other sides of the screen slowly to loosen the screen. [Note: do it slowly without damaging the home button]
- Now put the bottom part of the iPhone and smoothly lift the screen up by making an angle of 90 degrees. But don’t remove the screen completely as it is still connected to some wires.
Removing components:
- Remove the metal plate that is inside the top
right corner of iPhone by opening the screw.
- After removing the metal plate, there are three
ribbons that connect the screen and phone together. Remove that ribbons too by
using fingertips and lift up the screen.
- There is another metal plate that is visible
after lifting up the screen. You should remove it by using a pentalobe
screwdriver.
- Then start removing the metal plate that covers
the home screen button, slowly with a pentaloble screwdriver.
- The Last thing in this step is to remove the
back plate through pentalobe screwdriver by opening all four screw (near to earpiece,
near to home button, two along each side of the iPhone) gently.
Placing new screen:
·
After completing the above step, apply the home
button screen into the new screen and tied up their screw.
·
Attach that small metal plate at the top of the iPhone
and make sure that camera should fix at its position.
·
Reattach the back metal plate by screwing its
four screws.
·
Attached the removed earpiece at the top of the
iPhone.
·
Connect those detached ribbons to the new screen
and place back the metal place on it.
·
After doing all these steps your iPhone and new
screen are loosely connected. Fix them by pressing the screen from top to
bottom slowly. Then turn on your phone and use it as you want.
METHOD 2:
APPOINT SMART FIX TECHNICIAN:
Above method is a lengthy one. If you have a
busy schedule then you are unable to do the above method by yourself. So don’t
worry Smart Fix will provide you the best technician at your place. Our
technician reached your place within an hour and fix your iPhone or iPad screen
or any other issues. The services provide by our experts is fully reliable and
of high quality. We provide you the best repairing services at reasonable
prices that suit your pocket.
Leave Comments